
Nano Banana Video: Turn Images Into Clips Free, Tested
Nano Banana video, tested: Nano Banana makes images, not video, but Google Flow animated mine free. Start frame, end frame and reference, with credit costs.
Contents
Nano Banana does not make video. It is Google’s image model, so a “Nano Banana video” is really a Nano Banana image handed to a video model that animates it. On 5 October 2026 I did that for free in Google Flow, Google’s AI filmmaking app: two Nano Banana Pro images at no cost, then four clips from them for 36 of my 50 daily credits.
There are three ways to animate an image, and they behave very differently. I tested all three on the same picture of a red hot-air balloon, plus a cheap low-resolution version to compare.
| How I animated the image | Model | Credits | What came back |
|---|---|---|---|
| As the start frame | Veo 3.1 Lite, 8 s | 10 | Crowd waving, ends on the balloon alone above the mist |
| As start and end frame | Veo 3.1 Lite, 8 s | 10 | A move from my first image to my second |
| As a reference | Omni Flash 720p, 8 s | 12 | The same balloon in a new scene over a river |
| As the start frame, cheaply | Omni Flash 360p, 4 s | 4 | The rising shot, shorter and softer |
Can Nano Banana make videos?
No, and nothing official claims it can. Nano Banana is the nickname for Google’s Gemini image models: Nano Banana 2 and Nano Banana 2 Lite in the Gemini app, and Nano Banana Pro for the most detailed work. They make and edit still pictures; our how to use Nano Banana guide shows the image side step by step, and our Nano Banana review covers what it does well. Searches for a Nano Banana video generator or Nano Banana Pro video all lead to the same two-step job.
Video comes from Google’s other models. Veo 3.1 and Gemini Omni Flash both accept an image as part of the prompt, which is how a Nano Banana picture becomes a moving shot. Google puts both kinds of model in one place in Google Flow, its AI filmmaking app, and that is where I ran this test.
You will also find websites with “Nano Banana video” in their names. They are third parties, not Google, so treat them like any other app that resells access to someone else’s model. I did not test any of them.
Where you can do it with Google’s own tools
There are two Google routes, and only one, Google Flow, is a free image to video AI route.
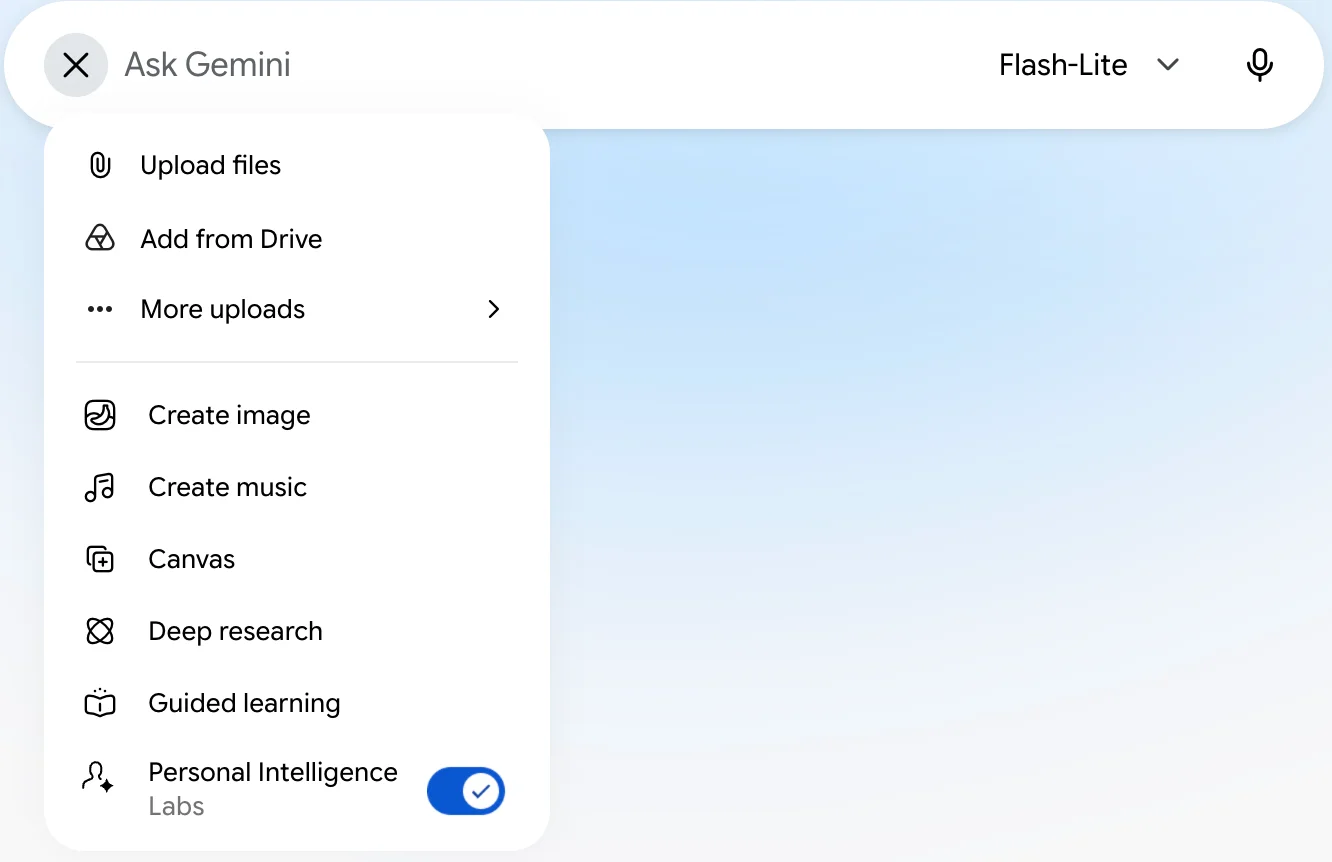
The Gemini app. On my free account, neither the tools menu in the prompt box (Create image and Create music, but no video) nor the sidebar offered video. Google’s help page on video in Gemini explains why: to make video with a personal account, “you must have a Google AI plan”. With a plan, Gemini makes video with Gemini Omni and lets you blend in your own images.
Google Flow. Every Google account gets 50 Google Flow credits a day, and Flow runs both the image models and the video models. My images cost nothing, and each clip showed its price before I approved it. Our Google Flow free guide explains the daily allowance in full, and our Google Flow tutorial covers the app from a blank project.
The rest of this guide uses Flow, because it is the route a free account can actually use.
Nano Banana image to video in Google Flow, step by step
The whole process runs through Flow’s agent, the chat panel on the right of a project.
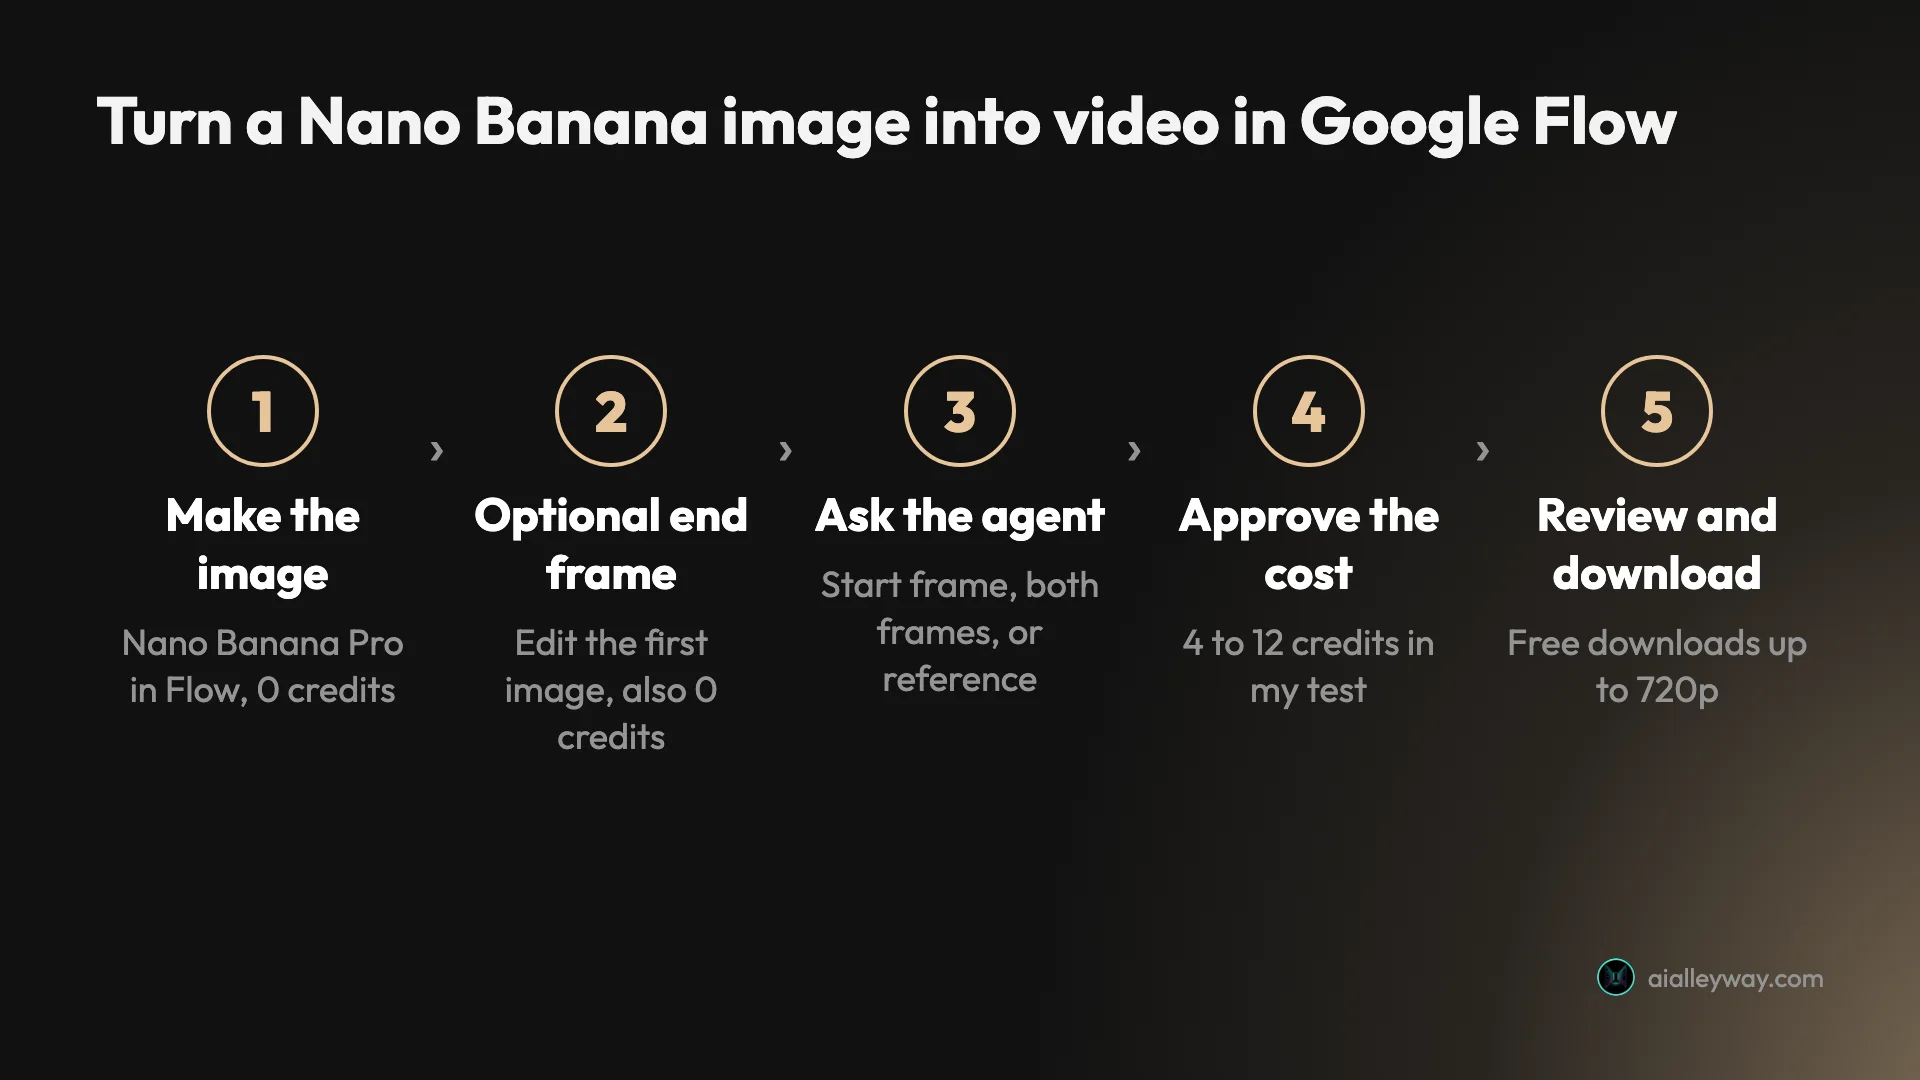
- Make the image. In a new Flow project I asked: “Make 1 image with Nano Banana Pro, 16:9 landscape: a red hot-air balloon just lifting off from a misty green valley at sunrise, a small crowd watching, photorealistic.” It arrived in about 80 seconds with no approval card and no credit cost.
- Make an end frame, if you want one. I asked for “a new version of the balloon image as an end frame: the same red balloon now high in the sky above the valley, the crowd small far below…”. Flow kept both images, and the agent offered to animate the transition between them.
- Ask for the video. Name the image, how to use it, the model, the length and the shape, then describe the motion.
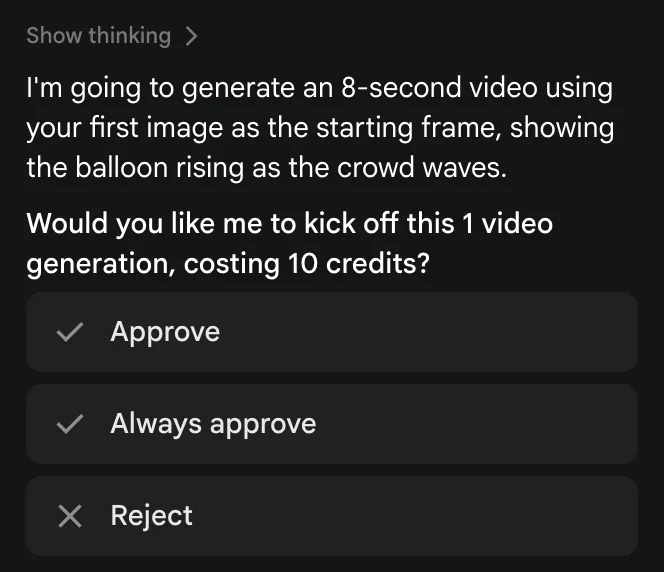
- Approve the cost. The agent shows a card such as “Would you like me to kick off this 1 video generation, costing 10 credits?” Nothing is spent until you approve.
- Review and download. Clips appear in the project grid. On a free account, downloads go up to 720p.
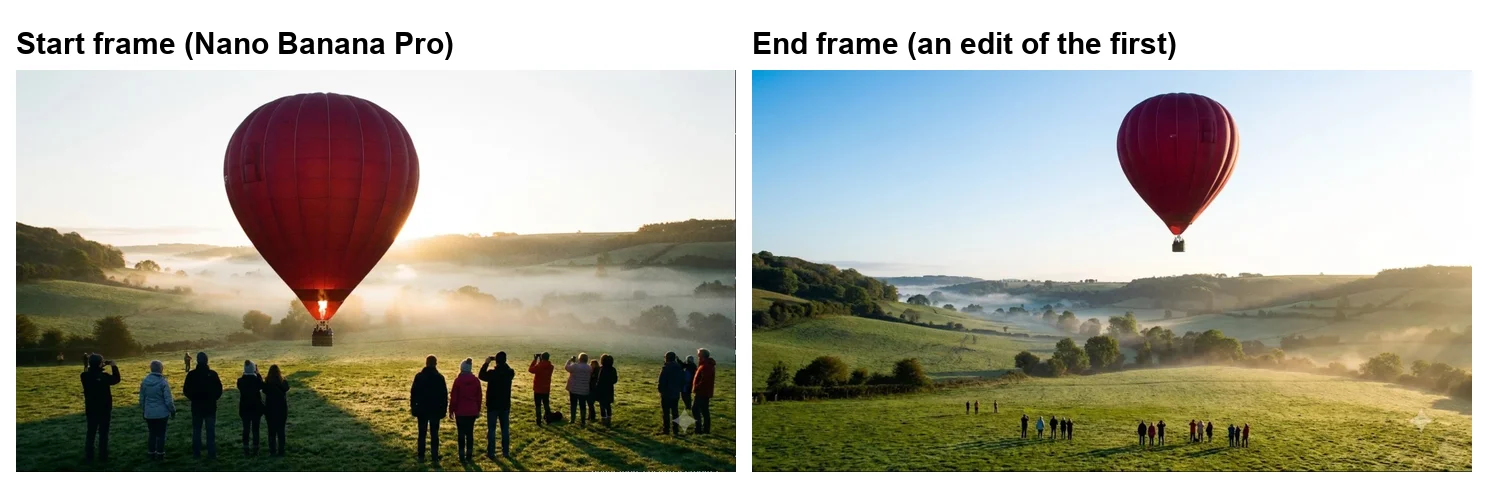
Both images kept the same balloon, with its dark red envelope and a small square panel near the top. That consistency matters, because a start-and-end-frame clip only looks natural when both frames show the same world.
Method 1: the image as the start frame
This is the default way to animate a picture. Your image becomes frame one, and the video model decides what happens next.
My prompt was: “Use the first balloon image (balloon low, crowd close up) as the start frame of an 8-second Veo 3.1 Lite video, 16:9: the balloon slowly rises off the ground while the crowd waves, burner flame flickering.” The agent replied that it would use my first image as the starting frame and asked for 10 credits.
The clip opened on my exact image. By the middle the crowd had raised their arms and were waving, and the burner glowed under the envelope. By the last frame the camera had tilted up to the balloon, the crowd had left the shot, and the balloon hung alone above the mist. That was a choice the model made, not one I asked for. It looks good, but if you need the people in the final frame, say so in the prompt. I did not check the sound on any of these clips; in our Google Veo review, Veo 3.1 Lite clips came with native audio.
The start frame is the right method when your image is the scene you want and you are happy for the model to choose how it moves. It is also the most forgiving, because there is no second frame for the motion to reach.
Method 2: start and end frames
Add an end frame and you control both ends of the shot. The model only invents the movement in between.
My first attempt at this one went wrong on my side. The agent said it would generate the transition and then waited, so I nudged it with “Go ahead”, and it showed a 10-credit card. I approved it and then clicked where the send button had been while the agent was still working, which hit Stop and cancelled the request. Nothing was charged. A second request, “Please start the start-and-end-frame transition video again (Veo 3.1 Lite, 8 seconds, 16:9) and show me the cost”, went through for 10 credits.
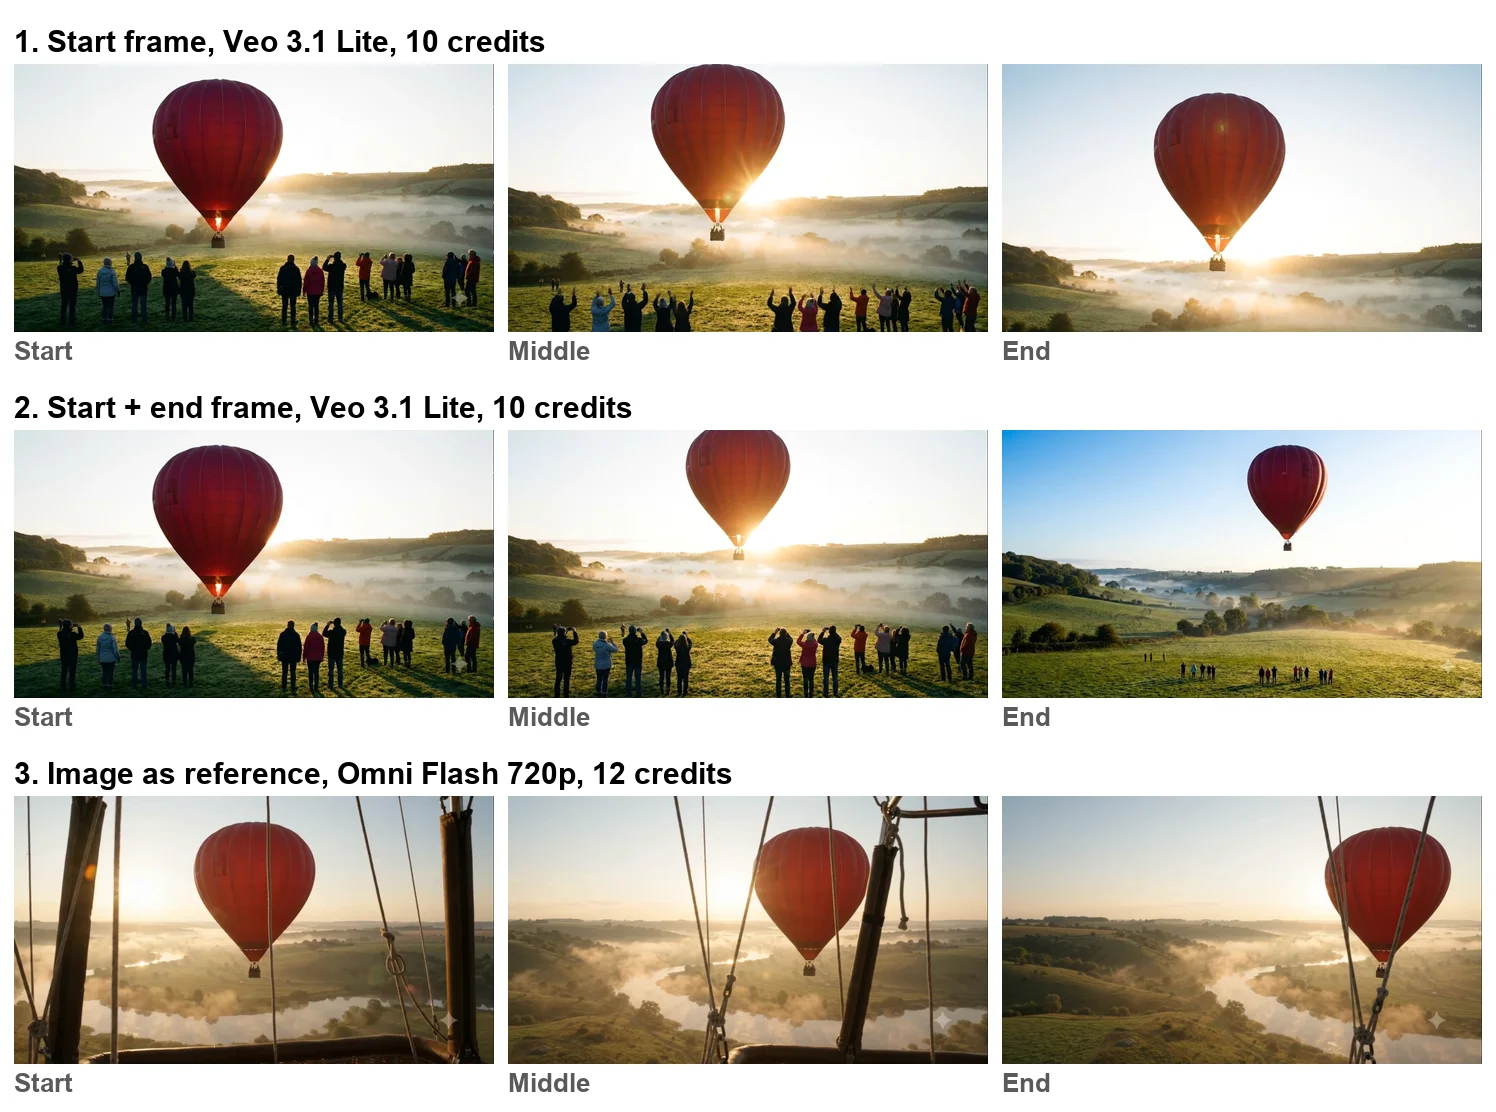
The result is the most controlled of the three. It opens on my first image. At the middle the balloon is climbing and the crowd is filming it on their phones, and the last frame matches my second image: a wide valley, the balloon small in a blue sky, the crowd tiny on the grass. I checked only the start, middle and end frames, not the motion between them.
Use this method when you know where a shot must finish, such as a product that has to end on its label or a scene that cuts into another. The work is in the second image, and Nano Banana is good at making a consistent second image by editing the first.
Method 3: the image as a reference
A reference, which Google’s help pages call an ingredient, is different. The model does not start or end on your image. It keeps the look of the subject and builds a new scene around it.
I asked for “the first balloon image as a reference (ingredient), not a start frame: an 8-second Omni Flash video at 720p, 16:9, of the same red balloon drifting over a river at golden hour, seen from a second balloon nearby”. After one nudge the agent asked for 12 credits.
The clip is the most striking of the four. It is shot from inside another balloon’s basket, with ropes and the burner frame in the foreground, and my red balloon drifts over a winding, misty river. The balloon kept its colour, shape and the small panel near the top, so it reads as the same balloon in a new place. None of the frames matches my original image, which is exactly what a reference is for.
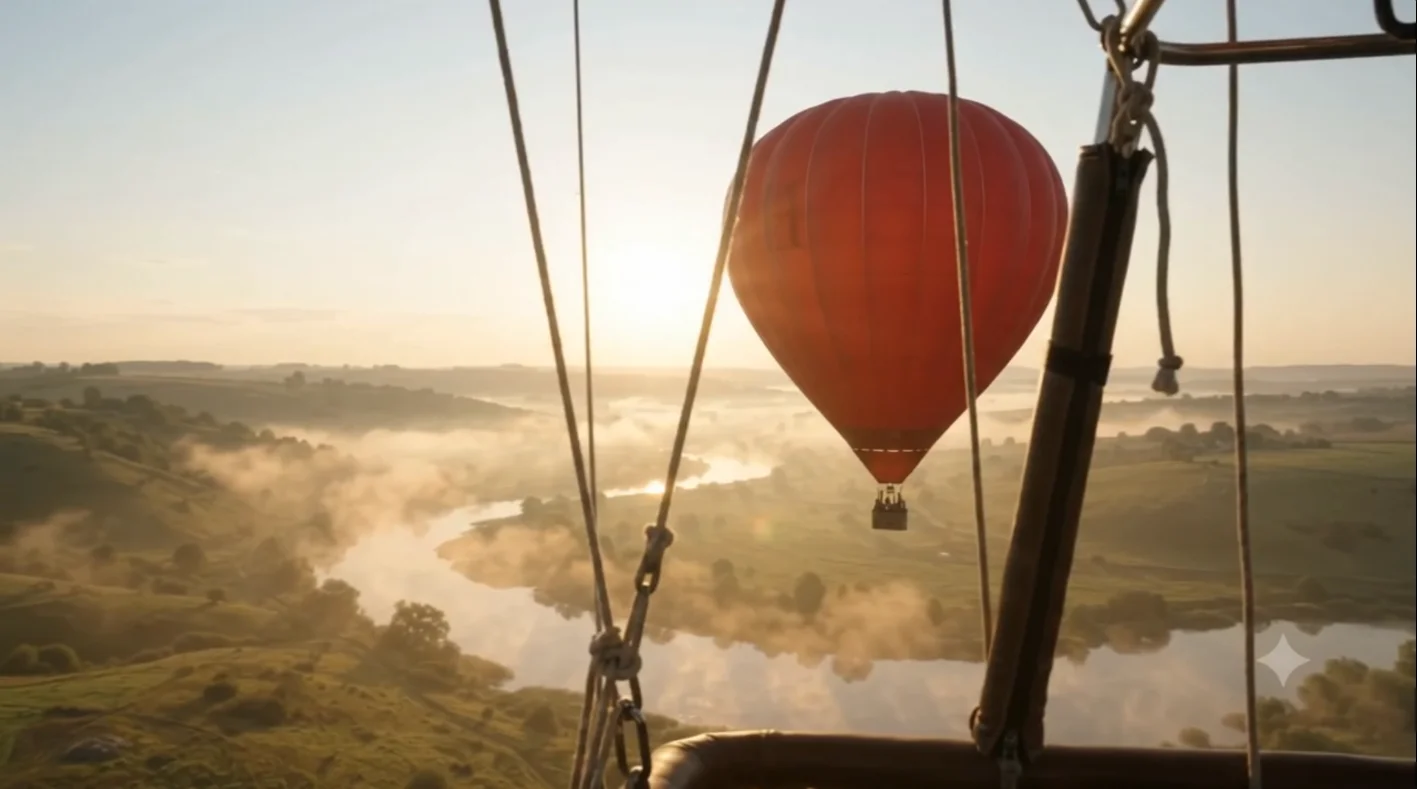
Use a reference when you want the same character, product or object in shots your image does not show: a new angle, a new setting, the next scene of a story. For a person you plan to reuse often, Flow’s Characters feature does the same job with a saved portrait and body shot, as our Google Flow tutorial shows.
One limit to know before you choose a model: Google’s models page says references on Veo 3.1 Lite and Fast only work for 8-second clips, and Veo 3.1 Quality does not take references at all. For a shorter reference clip, or a 10-second one, Omni Flash is the model to pick. Flow lists it as Omni 1.1 Flash in the model menu.
Which models accept frames and references
Not every video model in Flow takes your image the same way, and Google’s models page spells out which does what. Frames, meaning a start frame or a start and end frame, work on every Veo 3.1 model and on Gemini Omni Flash. References, which Google calls ingredients, are where the models differ.
| Model | Start frame | Start + end frame | Reference (ingredient) | Clip lengths |
|---|---|---|---|---|
| Veo 3.1 Lite | Yes | Yes | Yes, 8 s only | 4, 6, 8 s |
| Veo 3.1 Fast | Yes | Yes | Yes, 8 s only | 4, 6, 8 s |
| Veo 3.1 Quality | Yes | Yes | No | 4, 6, 8 s (credits page prices 8 s only) |
| Gemini Omni Flash | Yes | Yes | Yes | 4, 6, 8, 10 s |
Two details from Google’s create-videos help page are worth knowing before you start. For frames, Google tells you to describe “the action or transition that should happen between the frames”, which matches what worked for me: the prompt is about the motion, not the scene. For references, you describe “how your ingredients should be used as references within the clip”. And if you want a character’s voice in the video, Google says voice references only work in generations that use ingredients.
The same page describes a route without the agent: pick Video in the prompt box, then Frames or Ingredients, drag your images into the start, end or ingredient slots, and press Generate. I used the agent throughout, because it let me describe the job in one sentence and showed the price before anything ran. If you prefer to place the images yourself, the manual route does the same job.
The cheap version: 360p for 4 credits
To see what the smallest budget buys, I asked for the same start-frame shot as a 4-second Omni Flash clip at 360p. The agent went straight to a 4-credit card, with no stall.
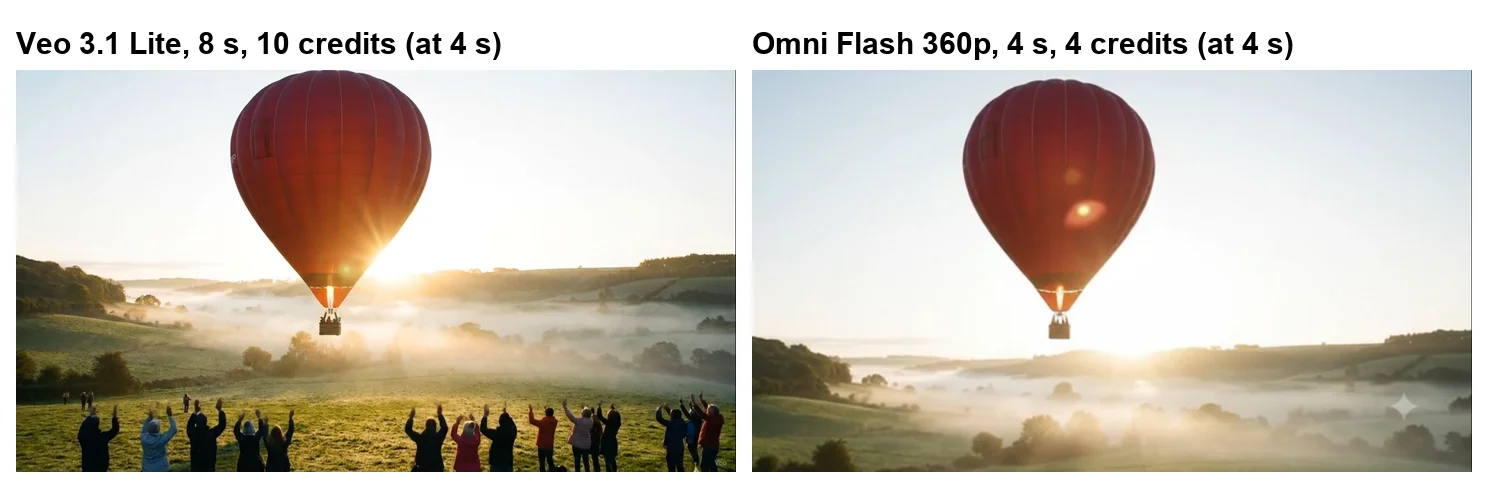
It does the job of a draft. By four seconds the balloon is up in the sky against a sun flare and the crowd is out of shot, but at 360p the picture is visibly soft next to the Veo clip, and four seconds leaves little room for anything to happen. I would use it to check that a prompt moves the way I want before spending 10 or 12 credits on the version to keep. Google’s models page says Omni at 360p costs half as much as 720p, and that Pro and Ultra subscribers can upscale a 360p Omni clip to 720p for 0 credits, an option a free account does not get.
What it costs to animate Nano Banana images
The images were free in my test, so the cost is all in the video. These are Google’s published costs per clip, and every card I saw matched them.
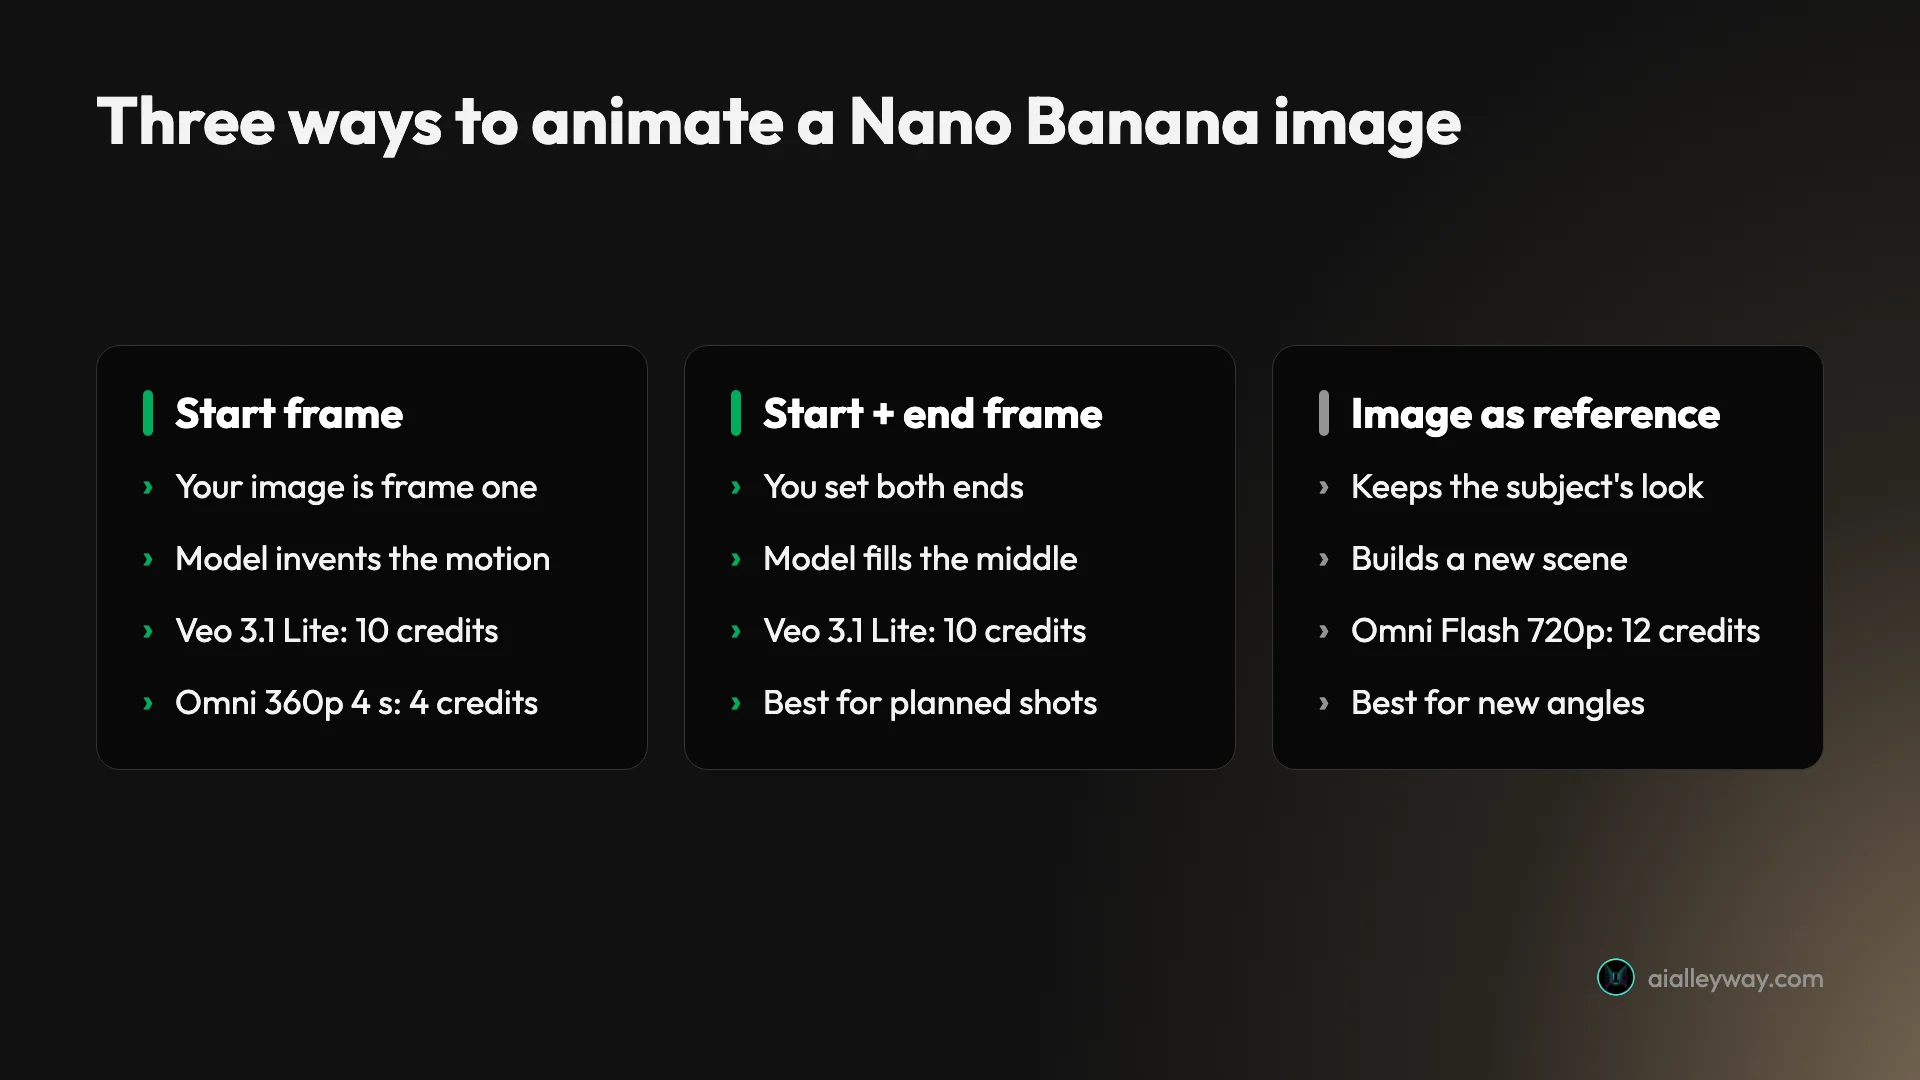
| Model | Clip | Credits | Clips from 50 free a day |
|---|---|---|---|
| Gemini Omni Flash, 360p | 4 s | 4 | 12 |
| Veo 3.1 Lite | 8 s | 10 | 5 |
| Gemini Omni Flash, 720p | 8 s | 12 | 4 |
| Veo 3.1 Fast | 8 s | 20 | 2 |
| Veo 3.1 Quality | 8 s | 100 | 0 |
My four clips came to 36 credits, and the account menu showed 14 left afterwards. Paid Google AI plans add monthly credits on top of the daily 50, from 200 a month on the $4.99 Plus plan; our Google Flow free guide has the full comparison.
Prompting tips for image-to-video
The image already sets the scene, so the prompt’s job is the motion. These are the habits that worked for me.
| Part of the prompt | Vaguer (not tested) | What I used |
|---|---|---|
| How the image is used | ”Animate this image" | "Use the first balloon image … as the start frame” |
| The motion | Re-describing the scene | ”The balloon slowly rises off the ground while the crowd waves” |
| Settings | Left to defaults | ”8-second Veo 3.1 Lite video, 16:9” |
| A reference | ”Make a video like this" | "Use the first balloon image as a reference (ingredient), not a start frame” |
- Describe what moves, not what is there. The image already shows the scene.
- Say how the image is used. Start frame, both frames or reference each produced the method I asked for.
- Name the model, length and shape. The card’s price then confirms the model, and on Omni Flash the length and resolution too. Keep the shape the same as the image; mine were 16:9 throughout.
- Make end frames by editing, not from scratch. Asking Nano Banana for “a new version” of the first image kept the balloon identical, so the start and end frames showed the same world.
- Draft cheaply before you commit. A 4-second 360p Omni clip costs 4 credits and shows whether the motion goes the right way. Once it does, spend 10 or 12 credits on the 8-second version you will keep, so one bad prompt does not eat a fifth of your day.
- Say what must stay in shot. The model framed the start-frame clip its own way and dropped the crowd by the end. If something must stay visible, put it in the prompt.
Image-to-video mistakes that waste credits
- Looking for video in the free Gemini app. Google says video in Gemini needs a Google AI plan, and my free account showed no video option. Use Flow.
- Expecting Nano Banana itself to animate. It only makes stills. The video model, and its credit cost, is a separate step.
- Clicking send while the agent is working. The send button turns into Stop. I cancelled a request that way. Nothing was charged, but I had to ask again.
- Waiting on a silent agent. Two of my four video requests announced the video and then stopped without a card. A short nudge, “Go ahead” or “Go ahead and show me the cost”, brought the card up both times.
- Mismatched frames. A start and end frame from two unrelated images forces the model to invent a big change. Make the second frame by editing the first.
- Ignoring the watermark rules. Google adds an invisible SynthID mark to every Flow output, and a visible one automatically in a few countries, including India and South Korea. A Veo clip I downloaded from one of those countries carried a small “Veo” label in the corner.
Start frame, end frame or reference: picking one
Each method suits a different job. This is how they compared in my test.
| Method | Use it when | Model I used | Credits | Result in my test |
|---|---|---|---|---|
| Start frame | Your image is the shot and the model can choose the motion | Veo 3.1 Lite, 8 s | 10 | Crowd waving, ends on the balloon in the sky |
| Start + end frame | The shot must end somewhere specific | Veo 3.1 Lite, 8 s | 10 | Ends on a frame matching my second image |
| Reference | You want the same subject in a new scene | Omni Flash 720p, 8 s | 12 | Same balloon, new shot over a river |
| Cheap start frame | You are testing a prompt | Omni Flash 360p, 4 s | 4 | Soft, short draft |
- Pay for a Google AI plan if you need 1080p downloads, more clips than 50 credits a day allows, or video inside the Gemini app. Plus starts at $4.99 a month in the US.
- Skip all of this if you need long single takes. Flow’s clips run 4 to 10 seconds, and longer videos are built from several clips on the timeline.
Final word
“Nano Banana video” is a two-step job, and Google Flow is the free place to do both steps. Make the image with Nano Banana Pro at no cost, then decide how the video should use it: as the first frame, as both ends of the shot, or as a reference for a new scene. Each method did exactly what it promised in my test, and the most I paid for a clip was 12 credits.
Start with a start-frame clip on Veo 3.1 Lite. If it moves the way you want, you have your video for 10 credits. If you need the shot to end somewhere particular, make a second image and try start and end frames. And if the subject matters more than the framing, use the image as a reference and let the model find a better shot than the one you drew.
Frequently asked questions
Can Nano Banana make videos?
No. Nano Banana is Google's image model: it makes and edits still pictures. To get a video, you hand a Nano Banana image to a video model such as Veo 3.1 or Gemini Omni Flash, which uses it as the first frame, the last frame or a reference.
Google Flow does both steps in one project. On 5 October 2026 my free account made two Nano Banana Pro images there at no credit cost and turned them into four clips for 36 credits.
How do I turn a Nano Banana image into a video for free?
Open Google Flow, make the image with Nano Banana, then ask Flow's agent to use it as the start frame of a video and approve the credit cost. Every account gets 50 Google Flow credits a day, and a start-frame clip cost me 10 credits on Veo 3.1 Lite or 4 credits for a short 360p clip on Omni Flash.
The free Gemini app is not the route: Google's help page says video in Gemini needs a Google AI plan, and neither the tools menu nor the sidebar on my free account offered video.
What is the difference between a start frame, an end frame and a reference image?
A start frame makes your image the first frame, and the model invents the motion that follows. Adding an end frame fixes the last frame too, so the model fills in the movement between your two images. A reference, which Flow calls an ingredient, keeps the look of your subject but lets the model build a new scene around it.
In my test the start frame and the start-plus-end frame clips each cost 10 credits on Veo 3.1 Lite, and the reference clip cost 12 credits on Omni Flash at 720p.
Is there an official Nano Banana video generator?
No. Google does not sell a product called Nano Banana video. Websites that use the name are third parties, not Google. Google's own routes to video from a Nano Banana image are Google Flow, which has a free daily allowance, and video in the Gemini app, which Google's help page says needs a Google AI plan on a personal account.
How long can a Nano Banana video be?
A single clip in Google Flow is 4 to 8 seconds on Veo 3.1 and up to 10 seconds on Gemini Omni Flash, per Google's models page. My clips were 8 seconds on Veo 3.1 Lite and Omni Flash at 720p, and 4 seconds on Omni Flash at 360p.
Longer videos are made by adding clips on Flow's timeline, or by extending an 8-second Veo 3.1 clip with Veo 3.1 Lite, which I did not test.
Do Nano Banana videos have a watermark?
Google says every Flow output carries an invisible SynthID watermark, and a visible one is applied automatically in a few countries, including India and South Korea. I tested from one of those countries, where Veo clips showed a small Veo label and Omni clips a sparkle in the corner, and a Veo clip I downloaded on the same day carried the label too.
Outside those countries, Google's help page says a toggle in your Flow profile menu controls the visible mark.
Keep reading
How to Use Google Flow: A Hands-On Beginner's Guide
How to use Google Flow, tested on a free account: start a project, make free images, build a character with a voice, turn it into video and download it.
Google Flow Free: What 50 Daily Credits Buy, Tested
Google Flow free, tested on a free account: 50 credits a day bought four AI video clips, images cost nothing, and Veo 3.1 Quality was out of reach.
How to Use Nano Banana: Gemini's Image Model, Step by Step
How to use Nano Banana in Gemini: pick the right mode, prompt, edit in plain words and download, with which mode runs which model and what free users get.
Nano Banana Review and Pricing: Fast, Free, Nearly Exact
Nano Banana pricing, tested: 12 prompts on Gemini's free tier, no limit hit. 15 of 15 text strings right, most images in 30 seconds, and one tulip too many.